极狐GitLab 和 ArgoCD 的集成实践
 极狐GitLab
一体化安全 DevOps 平台
ArgoCD 和 GitOps 概述
ArgoCD 是一款开源且主要针对 Kubernetes 来做 GitOps 的持续交付工具。现在是 CNCF 的孵化项目。其整体架构图如下:
在监听配置的极狐 GitLab 的仓库
ArgoCD 是以 Kubernetes Controller 的形式来实现的,它会对运行在 Kubernetes 集群上的应用程序进行监听,并将实际运行状态和期望状态(在部署清单文件中指定,且存储在版本控制系统中,诸如极狐 GitLab)进行对比,当两者状态不一致的时候,则提示 OutOfSync,此时可以通过自动或者手动的方式来完成同步操作,以让两者状态再次保持一致。存储在极狐 GitLab 仓库中的任何变更都会被自动同步至集群侧。
这其实就是实现 GitOps 的核心原理。所有对于应用程序或者基础设施的变更仅仅需对极狐 GitLab 仓库做一些 MR(Merge Request)或者 Push 操作即可实现,变更会自动部署。所以,虽然 GitOps 的核心不是 Git,但是却与 Git 息息相关。
极狐 GitLab 与 ArgoCD 的集成
极狐 GitLab 将作为存储部署清单文件的版本控制系统,与 ArgoCD 做集成,实现 GitOps workflow。整体示意图如下

因此,实现上述流程,需要
- 极狐 GitLab 实例(推荐使用 极狐 GitLab SaaS 服务,https://gitlab.cn)
- 一个运行正常 ArgoCD 运行实例
ArgoCD 的安装
ArgoCD 的安装比较简单,可以按照官方给的命令进行安装。
$ kubectl create namespace argocd
$ kubectl apply -n argocd -f https://raw.githubusercontent.com/argoproj/argo-cd/stable/manifests/install.yaml
但是,为了方便安装 ArgoCD,并使用 Kustomize 来完成对部署清单文件的编排,同时用 sops 来处理敏感信息在极狐 GitLab 上的存储(敏感信息的处理是实现 GitOps 很重要的一点)问题。我将 ArgoCD、Kustomize、sops 进行了集成,修改后的安装代码存放在极狐 GitLab 的这个仓库。
安装之前,先给大家介绍一下 sops。
sops 介绍
sops 是一款开源的加密文件的编辑器,支持 YAML、JSON、ENV、INI 和 BINARY 格式,同时可以用 AWS KMS、GCP KMS、Azure Key Vault、age 和 PGP 进行加密。由于 PGP(Pretty Good Priva)带有商业性质,所以我使用 GPG(Gnu Privacy Guard)来进行加密。
sops 利用 GPG 生成的一对 key 来完成文件的加解密工作,所以首先探秘 gpg。
探秘 gpg
以 Mac 上的操作为例,先用如下命令安装 gpg
$ brew install gnupg
查看 gpg 的版本以确定是否安装成功
$ gpg --version
gpg (GnuPG/MacGPG2) 2.2.27
libgcrypt 1.8.7
Copyright (C) 2021 Free Software Foundation, Inc.
License GNU GPL-3.0-or-later <https://gnu.org/licenses/gpl.html>
This is free software: you are free to change and redistribute it.
There is NO WARRANTY, to the extent permitted by law.
Home: /Users/xiaomage/.gnupg
Supported algorithms:
Pubkey: RSA, ELG, DSA, ECDH, ECDSA, EDDSA
Cipher: IDEA, 3DES, CAST5, BLOWFISH, AES, AES192, AES256, TWOFISH,
CAMELLIA128, CAMELLIA192, CAMELLIA256
Hash: SHA1, RIPEMD160, SHA256, SHA384, SHA512, SHA224
Compression: Uncompressed, ZIP, ZLIB, BZIP2
接下来用 gpg 命令行生成一对 key
$ gpg --full-generate-key
gpg (GnuPG/MacGPG2) 2.2.27; Copyright (C) 2021 Free Software Foundation, Inc.
This is free software: you are free to change and redistribute it.
There is NO WARRANTY, to the extent permitted by law.
Please select what kind of key you want:
(1) RSA and RSA (default)
(2) DSA and Elgamal
(3) DSA (sign only)
(4) RSA (sign only)
(14) Existing key from card
Your selection? 1
RSA keys may be between 1024 and 4096 bits long.
What keysize do you want? (3072) 4096
Requested keysize is 4096 bits
Please specify how long the key should be valid.
0 = key does not expire
<n> = key expires in n days
<n>w = key expires in n weeks
<n>m = key expires in n months
<n>y = key expires in n years
Key is valid for? (0) 5y
Key expires at Sat Aug 22 16:19:02 2026 CST
Is this correct? (y/N) y
GnuPG needs to construct a user ID to identify your key.
Real name: xiaomage
Email address: devops008@sina.com
Comment: sops and gpg demo
You selected this USER-ID:
"xiaomage (sops and gpg demo) <devops008@sina.com>"
Change (N)ame, (C)omment, (E)mail or (O)kay/(Q)uit? O
We need to generate a lot of random bytes. It is a good idea to perform
some other action (type on the keyboard, move the mouse, utilize the
disks) during the prime generation; this gives the random number
generator a better chance to gain enough entropy.
We need to generate a lot of random bytes. It is a good idea to perform
some other action (type on the keyboard, move the mouse, utilize the
disks) during the prime generation; this gives the random number
generator a better chance to gain enough entropy.
gpg: key 05A11CD02E66FF4B marked as ultimately trusted
gpg: revocation certificate stored as '/Users/xiaomage/.gnupg/openpgp-revocs.d/ED2A6947C44F9228B39E65B705A11CD02E66FF4B.rev'
public and secret key created and signed.
pub rsa4096 2021-08-23 [SC] [expires: 2026-08-22]
ED2A6947C44F9228B39E65B705A11CD02E66FF4B
uid xiaomage (sops and gpg demo) <devops008@sina.com>
sub rsa4096 2021-08-23 [E] [expires: 2026-08-22]
此时,的 private 和 public key 已经生成,其 fingerprint 为 ED2A6947C44F9228B39
E65B705A11CD02E66FF4B。
接着就可以和 sops 做集成了。
sops 和 gpg 的结合
sops 的安装可以使用下述命令行
$ brew install sops
也可以参考 sops 官网进行安装。通过下述命令来查看安装是否成功
$ sops --version
sops 3.7.1 (latest)
接下来就将 gpg 作为加密方式来使用 sops 对存储敏感信息的文件进行加解密演示。对 gpg 的使用有两种方式
将 fingerprint 作为环境变量注入当前环境,sops 会根据 SOPS_PGP_FP 所指定的 fingerprint 去查找对应的 key
创建 .sops.yaml 文件,在里面指定所需的 fingerprint 以及需要加密的字段
本文使用第二种方式来进行演示,而且可以将 .sops.yaml 存储到极狐 GitLab 上。将如下内容写到 .sops.yaml 中
$ cat >> .sops.yaml << EOF
> creation_rules:
>   - encrypted_regex: '^(username|title|)$'
>     pgp: 'ED2A6947C44F9228B39E65B705A11CD02E66FF4B'
> EOF
然后创建一个存放敏感信息的文件,诸如
$ cat >> secret.yaml << EOF
> apiVersion: v1
> data:
>     username: eGlhb21hZ2UK=
>     company: SmlIdShHaXRMYWIp=
> kind: Secret
> metadata:
>     labels:
>         app: demo
>     name: sops-demo
>     namespace: jihu-gitlab
> type: Opaque
> EOF
随后执行加密命令
$ sops -e secret.yaml
apiVersion: v1
data:
    username: ENC[AES256_GCM,data:/DqHU5DuhnWsnS3OoA==,iv:y8EQa6JOl+wElUeNaBUJyqRrVLMUOzVWiBqaXTi0yr4=,tag:8LcJ874DhdJJP5YO3bIzxQ==,type:str]
    company: ENC[AES256_GCM,data:ilwgbIQ9QN80gA0RuruQpVU=,iv:C/DVvZjr/E0cPSkpmzxZSNhiFYHRa6CdVPEqlGzj+s0=,tag:pj70zGTpYWomV8kCU5XeYQ==,type:str]
kind: Secret
**内容较长,只截取加密部分**
可以看到敏感信息 username: eGlhb21hZ2UK=(username: xiaomage)以及 company: SmlIdShHaXRMYWIp=(company: JiHu(GitLab))都被加密了。
至此我们就可以使用这个仓库的指导来完成 ArgoCD 的安装。
以在 Desktop Kubernetes 上安装为例
$ kubectl get nodes
NAME             STATUS   ROLES                  AGE   VERSION
docker-desktop   Ready    control-plane,master   20d   v1.21.2
clone 上述代码至本地
$ git clone git@gitlab.cn:xiaomage/argocd.git
创建安装 argocd 的 namespace:argocd
$ kubectl create ns argocd
namespace/argocd created
将前面生成的 gpg private key 导出
$ gpg --armor --export-secret-keys <your gpg identity key id > deploy-key.asc
将上述导出的 gpg private key 创建为 secret,只要是为了在 ArgoCD 中集成 sops
$ kubectl -n argocd create secret generic deploy-pgp-key --from-file=deploy-key.asc
执行安装命令
$ kubectl -n argocd apply -f install.yaml
查看安装结果
$ kubectl -n argocd get pods
NAME                                 READY   STATUS    RESTARTS   AGE
argocd-application-controller-0      1/1     Running   0          33s
argocd-dex-server-f8b64d975-6zshw    1/1     Running   0          34s
argocd-redis-9567956cd-qsvsm         1/1     Running   0          34s
argocd-repo-server-b79fb8c7b-qhtwn   1/1     Running   0          34s
argocd-server-6db46c865b-44482       1/1     Running   0
然后用下面的命令来暴露 argocd 的服务
$ kubectl -n argocd port-forward pods/argocd-server-6db46c865b-qqnbl 8080:8080
获取登陆密码
$ kubectl -n argocd get secret argocd-initial-admin-secret -o jsonpath="{.data.password}" | base64 -dRDMpJRKRfsmkcgbP
紧接着就可以用 http://localhost:8080 来进行访问并用用户名 admin 及上述密码进行登陆了。
ArgoCD 的使用
接下来就是配置 ArgoCD 了,大体分为以下几步:
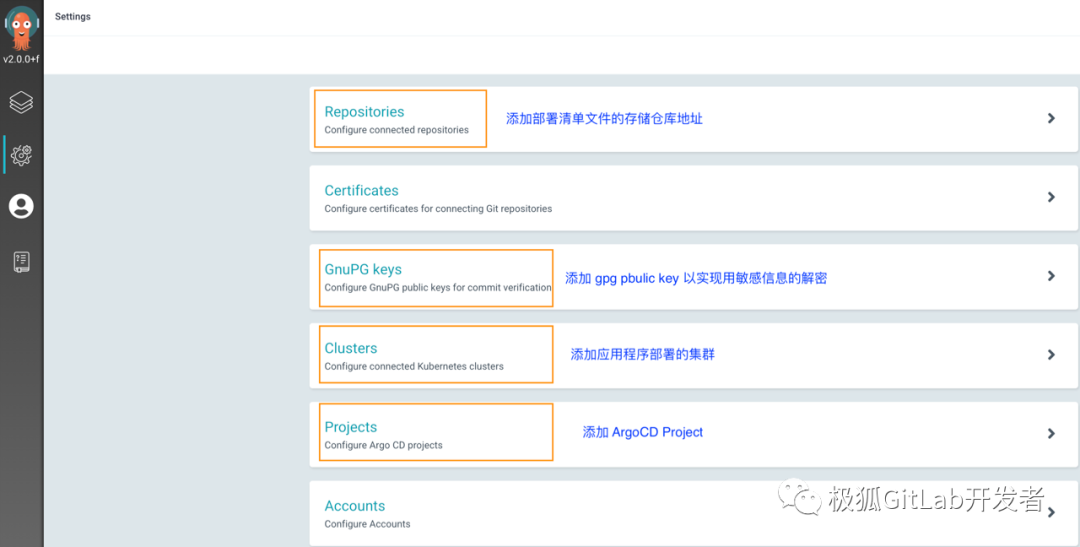
极狐 GitLab 仓库的添加

gpg public key 的添加
使用如下命令导出 gpg public key 并进行添加
$ gpg --armor --export 852CD8F0188F5521200DAD49D5104ECDA82480F1

ArgoCD Project 创建

ArgoCD Project 配置
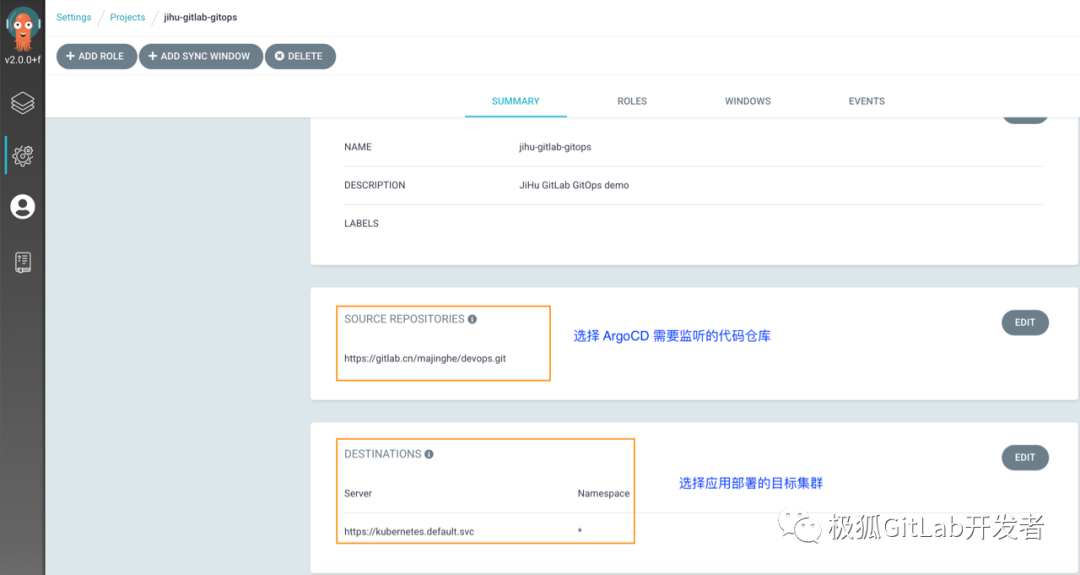
接下来就是最后的压轴环节:在 ArgoCD Project 下面添加 application,来让 GitOps 飞起来。
此时在 gitops-argocd namespace 下面可以查看运行的应用程序
$ kubectl -n gitops-argocd get pods
NAME                      READY   STATUS    RESTARTS   AGE
deploy-766c4cbbfc-m8dz6   1/1     Running   0          53m
查看此应用程序的输出
$ kubectl -n gitops-argocd port-forward pods/deploy-766c4cbbfc-m8dz6 9999:9999
$ curl localhost:9999/jihu
Hello JiHu GitLab,this is xiaomage,version is v6.1.0
至此 ArgoCD 的安装配置已经完成,且此 ArgoCD 实例已经在监听配置的极狐 GitLab 的仓库。如果上述仓库的配置文件发生了变化,则变化会被自动同步至 Kubernetes 集群侧。
ArgoCD GitOps workflow 验证
修改仓库的配置文件,比如修改 deployment.yaml 文件中的 image,则 ArgoCD 会监听到此次变更,并对 deployment 进行更新升级。
此时,再查看应用程序的输出
$ kubectl -n gitops-argocd port-forward pods/deploy-8587d5b58d-ffxqj 9999:9999
$ $ curl localhost:9999/jihu
Hello JiHu GitLab,this is xiaomage,version is v5.1.0
返回信息中的 V6.1.0 已经变成了 v5.1.0 说明变更已经被同步到了 Kubernetes 集群侧。
至此,极狐 GitLab 和 ArgoCD 完美集成,并实现了 GitOps workflow:
极狐 GitLab 作为单一可信源,存储部署清单文件
ArgoCD 作为 GitOps 工具
两者实现了:只要极狐 GitLab 仓库中的文件发生变化,则变更会在 ArgoCD 的操作下自动(也可手动)同步至 Kubernetes 集群侧。
 极狐GitLab
一体化安全 DevOps 平台

