- View Code Owners of a file or directory
- Set up Code Owners
- Related topics
Code Owners
Use the Code Owners feature to define who has expertise for specific parts of your project’s codebase. Define the owners of files and directories in a repository to:
- Require owners to approve changes. Combine protected branches with Code Owners to require experts to approve merge requests before they merge into a protected branch.
-
Identify owners. Code Owner names are displayed on the files and directories they own:
Combine Code Owners with merge request approval rules (either optional or required) to build a flexible approval workflow:
- Use Code Owners to ensure quality. Define the users who have domain expertise for specific paths in your repository.
- Use Approval rules to define areas of expertise that don’t correspond to specific file paths in your repository. Approval rules help guide merge request creators to the correct set of reviewers, such as frontend developers or a security team.
For example:
| Type | Name | Scope | Comment |
|---|---|---|---|
| Approval rule | UX | All files | A user experience (UX) team member reviews the user experience of all changes made in your project. |
| Approval rule | Security | All files | A security team member reviews all changes for vulnerabilities. |
| Code Owner approval rule | Frontend: Code Style |
*.css files
|
A frontend engineer reviews CSS file changes for adherence to project style standards. |
| Code Owner approval rule | Backend: Code Review |
*.rb files
|
A backend engineer reviews the logic and code style of Ruby files. |
View Code Owners of a file or directory
To view the Code Owners of a file or directory:
- On the left sidebar, select Search or go to and find your project.
- Select Code > Repository.
- Go to the file or directory you want to see the Code Owners for.
- Optional. Select a branch or tag.
GitLab shows the Code Owners at the top of the page.
Set up Code Owners
Prerequisites:
- You must be able to either push to the default branch or create a merge request.
- Create a
CODEOWNERSfile in your preferred location. - Define some rules in the file following the Code Owners syntax reference.
Some suggestions:
- Configure All eligible approvers approval rule.
- Require Code Owner approval on a protected branch.
- Commit your changes, and push them up to GitLab.
CODEOWNERS file
A CODEOWNERS file (with no extension) specifies the users or
shared groups responsible for
specific files and directories in a repository.
Each repository uses a single CODEOWNERS file. GitLab checks these locations
in your repository in this order. The first CODEOWNERS file found is used, and
all others are ignored:
- In the root directory:
./CODEOWNERS. - In the
docsdirectory:./docs/CODEOWNERS. - In the
.gitlabdirectory:./.gitlab/CODEOWNERS.
For more information, see Code Owners syntax and error handling.
When user or group change names
When a user or group change their names, the CODEOWNERS isn’t automatically updated with the new names.
To enter the new names, you must edit the file.
Organizations using SAML SSO can set usernames to prevent users from being able to change their usernames.
Add a group as a Code Owner
To set the members of a group or subgroup as a Code Owner:
In the CODEOWNERS file, enter text that follows one of these patterns:
# All group members as Code Owners for a file
file.md @group-x

# All subgroup members as Code Owners for a file
file.md @group-x/subgroup-y

# All group and subgroup members as Code Owners for a file
file.md @group-x @group-x/subgroup-y
Group inheritance and eligibility
In this example:
-
Parent group X (
group-x) owns Project A. -
Parent group X also contains a subgroup, Subgroup Y. (
group-x/subgroup-y) - Subgroup Y owns Project B.
The eligible Code Owners are:
- Project A: the members of Group X only, because Project A doesn’t belong to Subgroup Y.
- Project B: the members of both Group X and Subgroup Y.
Inviting subgroups to projects in parent groups
You can invite Subgroup Y to Project A so that their members also become eligible Code Owners.
If you do not invite Subgroup Y to Project A, but make them Code Owners, their approval of the merge request becomes optional.
Inviting subgroups to parent groups
Inviting Subgroup Y to a parent group of Project A is not supported. To set Subgroup Y as Code Owners, invite this group directly to the project itself.
Define more specific owners for more specifically defined files or directories
When a file or directory matches multiple entries in the CODEOWNERS file,
the users from last pattern matching the file or directory are used. This enables you
to define more specific owners for more specifically defined files or directories, when
you order the entries in a sensible way.
For example, in the following CODEOWNERS file:
# This line would match the file terms.md
*.md @doc-team

# This line would also match the file terms.md
terms.md @legal-team
The Code Owner for terms.md would be @legal-team.
Organize Code Owners by putting them into sections
In a Code Owners file, sections are named areas of the file that are analyzed separately, and always enforced. Until you define a section, GitLab treats your entire Code Owners file as a single section. Adding more sections changes how GitLab evaluates your Code Owners file:
- GitLab treats entries without sections, including rules defined before the first section header, as if they were another, unnamed section.
- Each section enforces its rules separately.
- Only one CODEOWNERS pattern per section is matched to a file path.
- In a section, GitLab uses the last pattern matching the file or directory for each section.
For example, in a CODEOWNERS file using sections, let’s look at the ownership of a README file:
* @admin

[README Owners]
README.md @user1 @user2
internal/README.md @user4

[README other owners]
README.md @user3
- The Code Owners for the
README.mdin the root directory are:-
@admin, from the unnamed section. -
@user1and@user2, from[README Owners]. -
@user3, from[README other owners].
-
- The Code Owners for
internal/README.mdare:-
@admin, from the unnamed section. -
@user4, from the last entry in[README Owners]. -
@user3from[README other owners]. (Both lines in[README Owners]match this file’s name, but only the last line in the section is kept.)
-
To add a section to the CODEOWNERS file, enter a section name in square brackets,
followed by the files or directories, and users, groups, or subgroups:
[README Owners]
README.md @user1 @user2
internal/README.md @user2
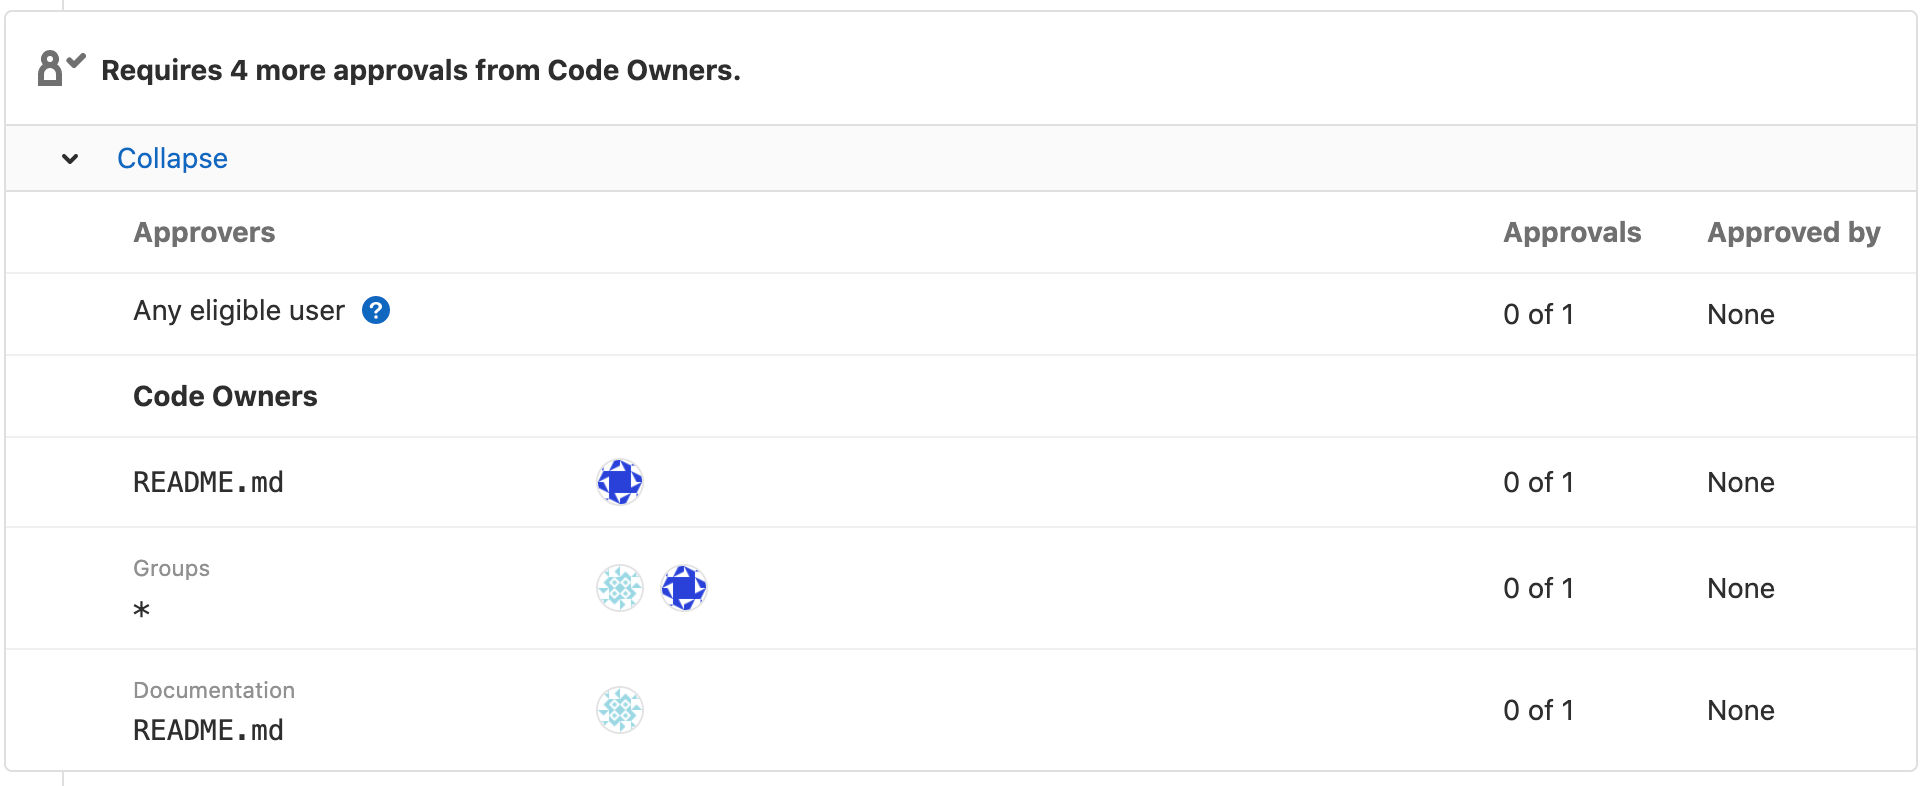
Each Code Owner in the merge request widget is listed under a label. The following image shows Groups and Documentation sections:
Set default owner for a section
-
Introduced in GitLab 15.11 with a flag named
codeowners_default_owners. Disabled by default. -
Generally available in GitLab 15.11. Feature flag
codeowners_default_ownersremoved.
If multiple file paths inside a section share the same ownership, define default Code Owners for the section. All paths in that section inherit this default, unless you override the section default on a specific line.
Default owners are applied when specific owners are not specified for file paths. Specific owners defined beside the file path override default owners.
For example:
[Documentation] @docs-team
docs/
README.md

[Database] @database-team @agarcia
model/db/
config/db/database-setup.md @docs-team
In this example:
-
@docs-teamowns all items in theDocumentationsection. -
@database-teamand@agarciaown all items in theDatabasesection exceptconfig/db/database-setup.md, which has an override assigning it to@docs-team.
Compare this behavior to when you use regular entries and sections together, when entries in sections don’t override entries without sections.
Use default owners and optional sections together
To combine the syntax for default owners with optional sections and required approvals, place default owners at the end:
[Documentation][2] @docs-team
docs/
README.md

^[Database] @database-team
model/db/
config/db/database-setup.md @docs-team
Use regular entries and sections together
If you set a default Code Owner for a path outside a section, their approval is always required. Such entries aren’t overridden by sections. Entries without sections are treated as if they were another, unnamed section:
# Required for all files
* @general-approvers

[Documentation] @docs-team
docs/
README.md
*.txt

[Database] @database-team
model/db/
config/db/database-setup.md @docs-team
In this example:
-
@general-approversowns all items everywhere, without overrides. -
@docs-teamowns all items in theDocumentationsection. -
@database-teamowns all items in theDatabasesection exceptconfig/db/database-setup.md, which has an override assigning it to@docs-team. - A merge request that modifies
model/db/CHANGELOG.txtwould require three approvals: one from each of the@general-approvers,@docs-team, and@database-teamgroups.
Compare this behavior to when you use only default owners for sections, when specific entries in a section override the section default.
Sections with duplicate names
If multiple sections have the same name, they are combined. Also, section headings are not case-sensitive. For example:
[Documentation]
ee/docs/    @docs
docs/       @docs

[Database]
README.md  @database
model/db/   @database

[DOCUMENTATION]
README.md  @docs
This code results in three entries under the Documentation section header, and two entries under Database. The entries defined under the sections Documentation and DOCUMENTATION are combined, using the case of the first section.
Make a Code Owners section optional
You can designate optional sections in your Code Owners file. Optional sections enable you to designate responsible parties for various parts of your codebase, but not require approval from them. This approach provides a more relaxed policy for parts of your project that are frequently updated, but don’t require stringent reviews.
To treat the entire section as optional, prepend the section name with the caret ^ character.
In this example, the [Go] section is optional:
[Documentation]
*.md @root

[Ruby]
*.rb @root

^[Go]
*.go @root
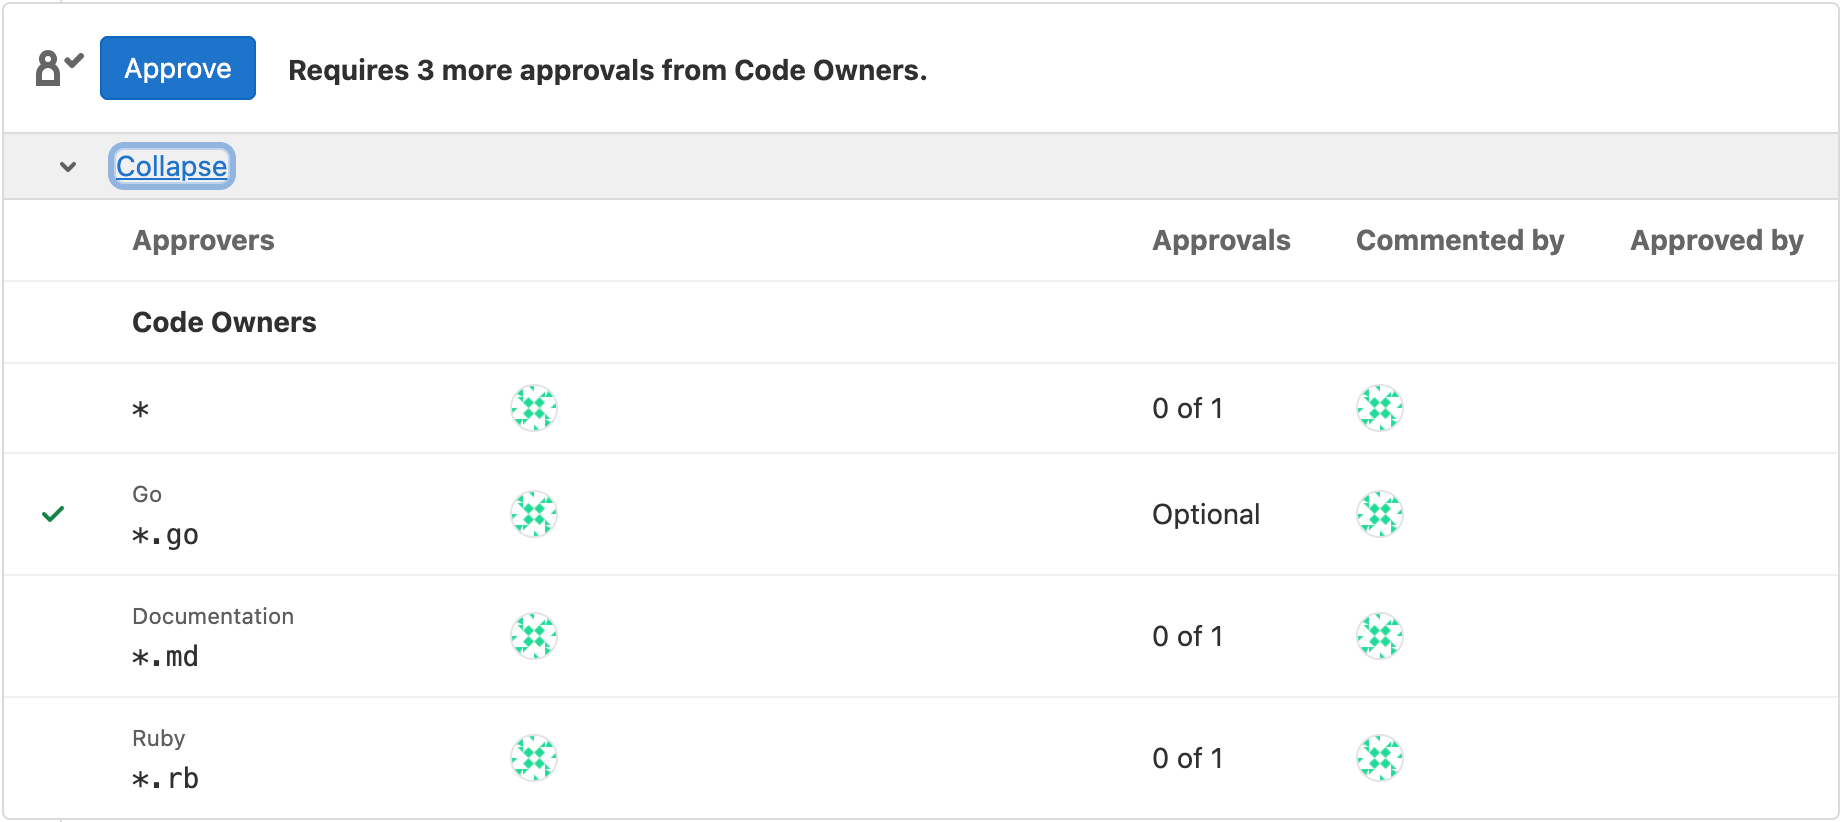
The optional Code Owners section displays in merge requests under the description:
If a section is duplicated in the file, and one of them is marked as optional and the other isn’t, the section is required.
Optional sections in the CODEOWNERS file are treated as optional only
when changes are submitted by using merge requests. If a change is submitted directly
to the protected branch, approval from Code Owners is still required, even if the
section is marked as optional.
Require multiple approvals from Code Owners
- Introduced in GitLab 15.9.
You can require multiple approvals for the Code Owners sections in the Approvals area in merge requests.
Append the section name with a number n in brackets, for example, [2] or [3].
This requires n approvals from the Code Owners in this section.
Valid entries for n are integers ≥ 1. [1] is optional because it is the default. Invalid values for n are treated as 1.
To require multiple approvals from Code Owners:
- On the left sidebar, select Search or go to and find your project.
- Select Settings > Repository.
- Expand Protected branches.
- Next to the default branch, turn on the toggle under Code owner approval.
- Edit the
CODEOWNERSfile to add a rule for multiple approvals.
For example, to require two approvals for the [Documentation] section:
[Documentation][2]
*.md @tech-writer-team

[Ruby]
*.rb @dev-team
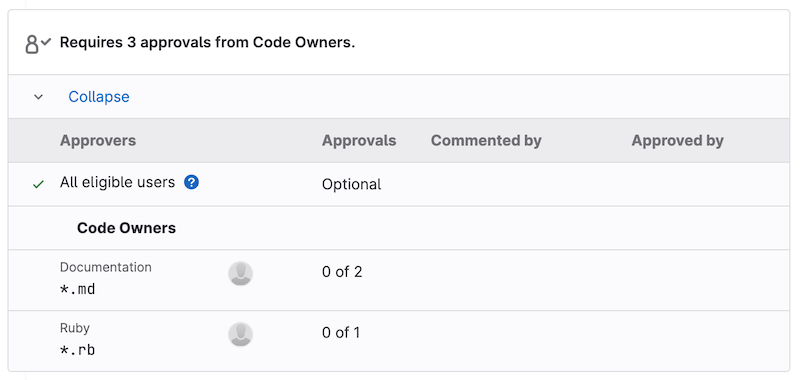
The Documentation Code Owners section in the Approvals area displays two approvals are required:
Allowed to push
Users who are Allowed to push can choose to create a merge request for their changes, or push the changes directly to a branch. If the user skips the merge request process, the protected branch features and Code Owner approvals built into merge requests are also skipped.
This permission is often granted to accounts associated with automation (internal users) and release tooling.
All changes from users without the Allowed to push permission must be routed through a merge request.


